Export Power-BI desktop data to Excel
Export Power-BI desktop data to Excel with R. This R script exports a Power BI table automatically to an Excel (xlsx) file. This works from your report with an ‘Export’ button. The maximum number of exported lines is 150 000.
How to export Power-BI desktop data to Excel
- Install R and R studio. Please have a look at Ruth Pozuelo’s video (Curbal)
- In some cases you may need to install Rtools which you will find at the same place than R
- In R studio, install “openxlsx” package
- In the desktop, create a new tab and name it ‘Export’
- Add a R visual and enable R visuals when the popup appears
- Select this visual and, in the ‘VISUALIZATIONS’ pane, add some fields under ‘Values’. These fields will be exported in the same order than in this list.
- In the format tab, under ‘Title’, type ‘Export with R script ‘
- In the ‘R script editor’, paste the code down below.
- Change the ‘ExportFile’ parameter in R script
- The file and its path must not include any accent
- Path separator is “/”
- Folders must exist and not read only
- The file will be created if it doesn’t exist
- Extension must be ‘.xlsx’
- The Excel file must not be open
- If ‘ExportFile’ parameter is empty, you will be able to chose the file or to create a new one
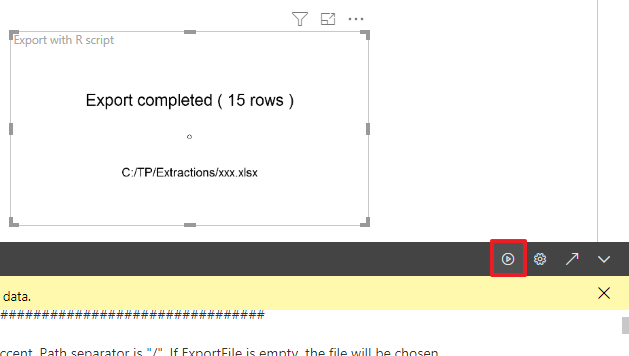
- When you are ready, click on the play button
- The file path and number of rows will be displayed if exportation has been done
- Exported data are filtered according to the filter context !
- If you get an error, check carefully the ‘Export file’ parameter
- Once it will work, you may change other parameters according to your needs
- The R visual always removes duplicated rows. If you don’t want, you need to add an index column
R code to paste into the R visual:
### Export parameters #################################################################################

# The file and its path must not include accent. Path separator is "/". If ExportFile is empty, the file will be chosen.
ExportFile = ""
#"C:/TP/Extractions/Automatic export test.xlsx"

# Sheet name
ExportSheet   = "Sheet 1"
# Appends data to existing file or overwrites existing fle
AppendToPreviousFile  = FALSE
# Includes header. Better to set to false if AppendToPreviousFile is TRUE
WithHeader    = TRUE
# Minimum days between 2 exports. 0 = no minimum. Very usefull if AppendToPreviousFile is true
DaysBetweenExports    = 0

### Export functions ##################################################################################

Message <- function(Text,Comment) {
    par(mar=c(1,1,1,1))
    NoPlot = c(0)
    barplot(NoPlot)
    plot(1:1, 1:1, main = "", sub = "", fg="white")
    text(1, 1.3, Text, cex = 2, fg="white")
    text(1, 0.8, Comment, cex = 1.5, fg="white")
    return()
}

Extract <- function() {
    # require(tcltk)
    #   button <- tkmessageBox(title = "Export confirmation", message = "Extract ?", icon = "info", type = "yesno")
    #   button <- tclvalue(button)
    #   if (button == 'yes') {

    #Message("Export in progress","")

    # Extraction

    # openxlsx package (based on C#)    https://cran.r-project.org/web/packages/openxlsx/openxlsx.pdf
    require(openxlsx)
    excel = createWorkbook(ExportFile)                          # Create workbook (i.e. file) to put data in
    addWorksheet(excel, ExportSheet)                            # Add worksheets to workbook
    writeData(excel, sheet = 1, dataset, , withFilter= TRUE)    # Add data to workbook
    saveWorkbook(excel, file = ExportFile, overwrite = !AppendToPreviousFile)    # Finally write out to file

    # xlsx package (based on java)
    #Sys.setenv(JAVA_HOME='C:\\Program Files\\Java\\jre1.8.0_202')
    #Sys.setenv(JAVA_HOME='C:\\Program Files (x86)\\Java\\jre1.8.0_202')
    #sessionInfo()
    #require(xlsx)
    #write.xlsx2(dataset, file=ExportFile, sheetName=ExportSheet, col.names=WithHeader, row.names=FALSE, append=AppendToPreviousFile)

    # WriteXLS package (based on Perl)
    #require(WriteXLS)
    #WriteXLS(dataset , ExcelFileName = ExportFile , SheetNames = NULL, perl = "perl", verbose = FALSE, Encoding = c("UTF-8", "latin1", "cp1252"), row.names = FALSE, col.names = TRUE,           AdjWidth = TRUE, AutoFilter = TRUE, BoldHeaderRow = TRUE, na = "", FreezeRow = 1, FreezeCol = 0, envir = parent.frame())

    # Success notification
    Message(paste("Export completed (", RowCount, "rows )"), ExportFile)

    #SecondsToWait = 1
    #require(tcltk)
    #tt = tktoplevel()
    #tktitle(tt) = "Data export"
    #tkwm.minsize(tt, 400, 50)
    #label = tklabel(tt, text = "Export completed")
    #tkpack(label)
    #Sys.sleep(SecondsToWait)
    #tkdestroy (tt)
    #   }
    return()
}

#######################################################################################################

options(java.parameters = "- Xmx1024m")     # Extends memory
Message("Export not done","")               # No export notification
RowCount = nrow(dataset)

#Choose a file if ExportFile is empty
if (ExportFile == ""){
    Filters = matrix(c("xlsx", "*.xlsx"), 4, 2, byrow = TRUE)
    ExportFile = choose.files(default = "", caption = "Select a file", multi = FALSE, filters = Filters)
    #, index = nrow(Filters))
}

if (length(ExportFile) == 0){
        Message("File selection was cancelled by user","")
} else {
    # No extract if the previous extract was made less than x days ago
    ExportFolder = dirname(ExportFile)
    if (dir.exists(ExportFolder)){
        File_informations <- file.info(ExportFile , extra_cols = FALSE)
        if (is.na(File_informations[1,"mtime"])){
            # File doesn't exist
            Extract()
        } else {
            if (difftime(Sys.time(), File_informations[1,"mtime"], units = "days") > DaysBetweenExports) {
                Extract()
            } else {
                Message(paste("Export already done within ", DaysBetweenExports, " day(s)"),"")
            }
        }
    } else {
        Message("Folder does not exist",ExportFolder)
    }
}
Each time the R script will execute, it will export data according to parameters and filter context
How to add an ‘Export’ button to other pages (optional)
- Open the ‘Export’ tab
- Open the ‘Bookmark’ pane
- Click on ‘Add’ and rename the bookmark ‘Export’
- On other pages, add a blank button
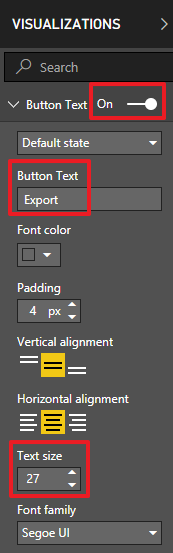
- In the ‘VISUALIZATIONS’ pane, activate the ‘Button text’ option
- Type ‘Export’ in the ‘Button text’ field
- Increase the ‘Text size’
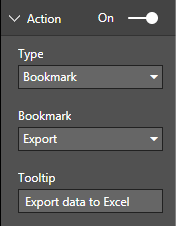
- Activate the ‘Action’
- Select ‘Bookmark’ type
- Select ‘Export’ bookmark
- Optionally type a tooltip
Now, you may click on ‘Export’ button to open the ‘Export’ page which will automatically export data to Excel
Download the report here : ‘Export data to xlsx file.pbix’

Easily export to Excel with Power BI Sidetools
While working in Power BI desktop, we often need to export to Excel some data…
Thank you for a great article. It is working on desktop, But I need to use it on service. Unfortunately openxlsx package is not available on PowerBIService
Thank you for your comment,
In the R script I tried other packages. You can uncomment the one based on java but I don’t know if it will work.
Anyway, I am not sure a cloud application can write on local drives.
Users can analyze in Excel if they have a license.
This has been what I have been looking for to help clean up some manual processes. But the issue I still have is that all the data that gets exported is in text. Yes the table I am using is all in text as well, but there are columns that I would like to have formatted as a timestamp yyyy-mm-dd HH:mm:ss.
Is there a easy way to do this?
Hi Karel,
I don’t know how to do that with R. My recommandation is to use Power BI Sidetools ‘Export to Excel’ feature which allows you to export to a pre formatted Excel file connected to your model :
https://thebipower.fr/index.php/2020/10/30/easily-export-to-excel-with-power-bi-sidetools/